Sunday, November 13, 2016

S'mores Bread Pudding


Fall has me thinking about warm desserts to welcome the colder weather. Usually, when I think desserts, I'm thinking something cold or room temp, whether it's pies, tarts, cake, ice cream, or custard. Nonetheless, there is little better than a warm bread pudding to lift your spirits.

Smoky marshmallow, melted chocolate, and soft bread and graham crackers make this a fun treat. I love it best served with ice cream when it's fresh out of the oven.


S'mores Bread Pudding
Bread (Enough to fill a 9 x 13 inch casserole dish most of the way)
1 cup Milk
1 cup Heavy Cream
9 Eggs
1 tsp Vanilla Extract
1/4 cup Sugar
1/4 cup Brown Sugar
1/2 cup Chocolate Chips
1/2 cup Graham Crackers, crushed
1/2 cup Mini Marshmallows

1. Preheat oven to 350 degrees F. Slice bread to 1 inch by 1 inch cubes.
2. In a medium pot, boil heavy cream and milk. In the meantime, whisk eggs, vanilla, brown sugar, and sugar in a large bowl.
3. Once the cream comes to a boil, pour the mixture slowly into the eggs, whisking the entire time.
4. Allow the mix to cool slightly. Then, add the bread into the bowl and toss very gently, so that the bread can keep its shape.
5. Then, add graham crackers, marshmallows and chocolate chips. Reserve about a handful of each to garnish the bread pudding as a topping.
6. Pour the bread pudding mixture into a cast iron pan, casserole dish, or any other oven-safe vessel. Then, garnish with the remaining chocolate chips, crushed graham cracker, and marshmallows.
7. Place the bread pudding in the oven for about 30 minutes, or until set. The bread pudding will puff up some. If the marshmallows begin to get golden, cover the vessel with foil until it's cooked through.
8. Once the bread pudding is set, and there is no watery liquid, remove from the oven. Serve as quickly as possible.

I think early fall/late summer means fire pits. Whether it's camping or other get togethers around a fire pit, where there is fire, there are s'mores. Also, since the Christmas season is coming up, there will be even more marshmallows to roast! This is a great way to utilize the leftover s'more ingredients, and would be a perfect addition to your Thanksgiving or Christmas spread!

Sunday, September 25, 2016

Apple Picking and Puff Pastry


Fall is officially upon us, although this week was still brutally hot in Georgia. Despite the hot weather, some friends and I went to a local orchard to go apple picking! We went to an orchard that had a lot of different apples to choose from and pick. The orchard we went to also had cow milking and pig racing! Both of them were pretty anticlimactic... Nonetheless we had a great time!


My favorite part of the day was a little stop we made on the way back.  On the way to the orchard, we saw a huge field of sunflowers from the road. We decided to take a quick adventure on the way back to Atlanta. The field had over 90,000 sunflowers, and lots of bees and butterflies to support! I'd say the only negative was when I stepped in an ant pile (ouch!). The orchard was about an hour and a half from the city, so we definitely made the most of the trip there!


We picked a total of 62 apples, and split it up between 8 of us. I don't usually eat apples, but the season calls for lots of apple desserts. I put together a quick cobbler and a pie, but I really wanted to make a flaky pastry with some of my apples.


I haven't made puff pastry since culinary school. It was only once before, and I understand why I haven't tried to make it again. It's a time consuming dough, but the finished product is well worth it! Laminated dough is something really special- every layer you make ends up in the finished product, creating the most wonderful texture. On top of that, the dough itself is not sweet.


Apple Puff Pastry (makes 12)

Dough
8 oz Flour
2.7 oz Water
2 oz Butter, Softened
Pinch Salt
1/3 of an Egg (mix it, then add only a third)
1 oz White Wine 

8 oz Plugra Butter, for Butter Block

1. Place the water, egg, wine, butter into a mixing bowl for a standing mixer. Then add the dry ingredients into the bowl. Use a dough hook attachment to mix the dough well.
2. Once the dough has started to gather and pulls away from the sides, turn on a timer and continue to mix on low speed for 6 minutes.
3. After 6 minutes, shape the dough into a square shape, wrap the dough, and put it into the fridge to rest.
4. Make a butter envelope by folding a piece of parchment paper to 7 inches x7 inches. You should be able to make an envelope shape. This is done by folding the parchment in half, short end to short end. Then, fold the sides in toward the center, so that the area inside of the fold is 7 inches. Then, fold the top portion of the parchment down, so that the square is complete.
5. Place the plugra butter block into the envelope. Use your rolling pin to roll the butter into the shape of the square. Make sure it's evenly rolled out. Place in the fridge to harden.
6. Once the dough and butter are at a similar consistency, pull them both out. They should both be firm but not hard.
7. On a floured surface, roll out the dough to a 10 inch x 10 inch square. Place the butter block on the dough, so that it sits as a diamond within the square. Bring the corners of the dough together to cover the butter. Do not overlap the dough corners.
8. Roll out the dough to a long rectangle. This is the portion of the dough where you make multiple folds to create layers of butter and dough. The first fold should be a 3-fold. Fold one side in, and the other side over, so that it is like a letter. Wrap and rest in the fridge for 15 minutes.
9. Roll out the dough in the opposite direction of the last fold. If the fold finished on the side, you should rotate the dough 90 degrees, so that the fold would finish on top or bottom. Roll out the dough to a long rectangle again. Fold the right side about 1/4 of the way inward. Then, fold the other side to meet the first flap. Then, fold the dough in half. Wrap the dough and rest in the fridge for 15 minutes.
10. Remove the dough from the fridge and repeat steps 8 and 9, so that you have performed a 3 fold, a 4 fold, a 3 fold, and another 4 fold.
11. Place the dough back into the fridge to rest until you are ready to assemble.

Frangipane (Almond Cream)
.5 stick Butter
2 oz Sugar
1.5 oz Almond Flour
1 egg
.5 oz Flour
.5 tsp Vanilla


1. Cream butter, sugar, and almond flour together in a bowl.
2. Add egg and vanilla.
3. Scrape the bowl to make sure that the ingredients are well incorporated.
4. Add flour and mix until incorporated.
Assembly
Final puff pastry dough
Frangipane
2 Apples
2 tbsp Sugar
Pinch Clove
Pinch Cinnamon
Pinch Ground Ginger

1. Roll out the puff pastry to about 1/8 inch thick. You can leave it a tiny bit thicker, but you want it to be less than 1/4 inch.
2. Preheat oven to 400 degrees F
3. Cut the rolled dough to 3.5 x 3.5 inch squares.
4. Place squares onto a flat, parchment lined sheet pan. There should be some space in between each.
5. Pipe frangipane into the center third of the pastry. This should be a layer that is not too thin or too thick. I look for something about 1/2 an inch thick.
6. Slice your apple into 1/4ths. Then slice out the core by make a diagonal cut. Cut the apple piece in half.
7. Taking the 1/8th of the apple, lay it on its side, so that the flesh faces away from you. Use your knife to slice about 1/8 inch pieces. You can discard the end pieces.
8. Arrange the sliced apples on top of the frangipane.
8. Sprinkle a small amount of the sugar and spice mixture over the top. 
9. Bake the pastry for about 20-25 minutes, until golden brown. 


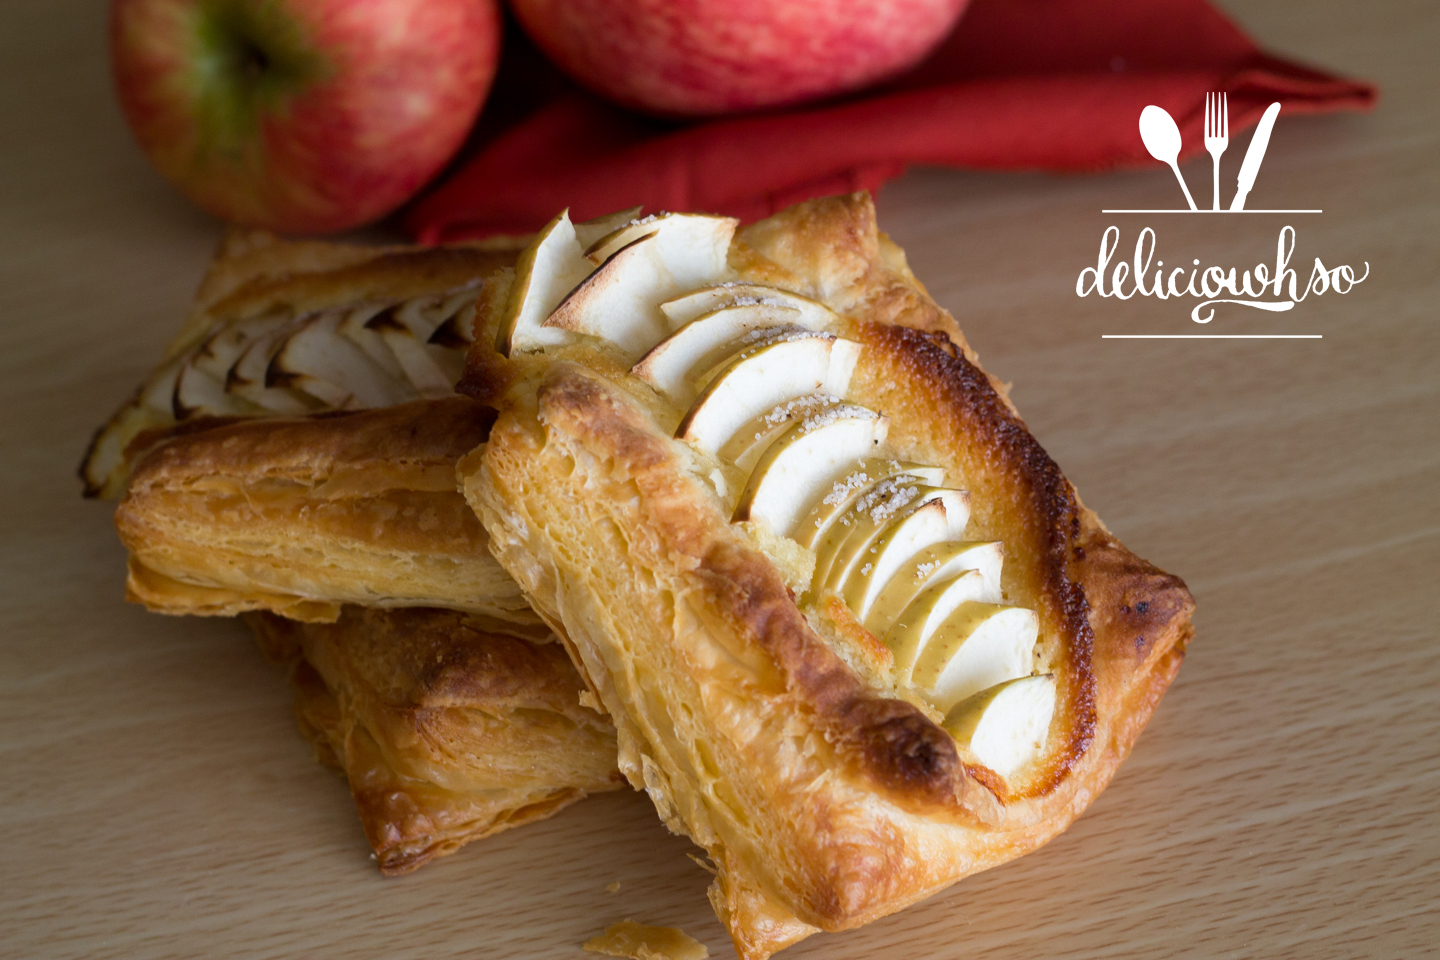
Once the apple pastries come out, they are flaky and tasty. The apples have a great natural sweetness that pairs perfectly with the almond cream and nutty pastry. If you're eating this after a day or multiple, be sure that you put it into the toaster oven for a short time. This will allow the pastry to recrisp. If you are short on time, you can also recreate this using store bought puff pastry.


I'm not the biggest dessert person, but I am a total sucker for french pastry. I love that it isn't too sweet, but still has a lot of integrity. French pastry is completely classic, elegant, beautiful, and tasty! It is a little bit time consuming, but definitely worth the effort.

Sunday, August 28, 2016

Classic Peach Cobbler


I feel like this summer has passed by so quickly. It's already the end of August! With the end of summer, you get peaches. Peaches and nectarines are transitioning out, but are still in season. They're going to be well prices and flavorful. I tossed a few peaches with some brown sugar, spices, and topped with with a flaky pie dough. It's a southern classic that praises the end of summer and sings in the new season.


Peach Cobbler (serves 2-4)
3 Peaches
2 tbsp Brown Sugar
1/2 tsp Cinnamon
1/8 tsp Clove
1/8 tsp Nutmeg
1/8 tsp Ginger
1 tbsp Corn Starch
pinch Salt
1/2 stick Cold Butter
3 oz Flour
pinch Salt
1 oz Cold Water

1. Peel peaches and cut into a large dice, about 1 inch thick
2. Toss the peaches in brown sugar, spices, salt, and corn starch. Allow to sit.
3. Preheat oven to 350 degrees F
4. Cut butter into small dices.
5. Place butter into a mixing bowl with flour and salt. Mix with a paddle attachment until the butter is broken down and flaky. If you don't have a mixer, you can use your fingers to press the butter and rub it together to break up the pieces.
6. Add the water to the flour mixture and allow it to form a loose dough.
7. Wrap the dough and allow to chill for about 30 minutes.
8. Place the peaches into a small cast iron skillet or a casserole dish.
9. Roll out the dough into a disk that covers the skillet.
10. Brush the dough with egg wash (1 egg, a little water, salt) and sprinkle with cinnamon sugar. Cut a few slits in the top to vent.
11. Bake the cobbler for 30-45 minutes, until golden brown.


The warm spices bring fall to your palate with the cinnamon, clove, nutmeg, and ginger. It's juxtaposed with bright peaches. The flaky crust is the best pairing for the warm peaches, and it's even better complimented with ice cream.


This is best served warm, just a few minutes out of the oven. I like spooning a generous portion onto a plate with a scoop of vanilla bean ice cream. I would definitely suggest you try this out before summer leaves us for the year!

Sunday, August 14, 2016

Baby Jake's First Birthday


So sorry it's been a while since I've updated the blog. Life and work are both SO busy right now, which leaves little time for inspiration and creativity... Luckily, I've been asked to do some desserts here and there, which always makes for some good content :) Read on and scroll on to see one of the more recent events I got to help out with!


I was asked if I could make some fun desserts and a cake for this precious baby's first birthday. Jake recently turned one! It was a great privilege to be able to contribute to this celebration for this sweet family.


For this event, Jake's family had requested some strawberry and blueberry champagne tarts, a two tier funfetti and lemon cake, and the cutest "1" shaped rice krispies for the kids. It was a perfect choice for the season- so refreshing and summery! 


A huge thank you to Tiny Atlas Photography (link to the website here), who took these amazing photos. Esther and I have actually worked a few events together, and I am always amazed at how stunning the results are. When I got to the venue, the lighting was pretty difficult to work with, but somehow Esther and her team worked magic! I would highly recommend Tiny Atlas for any photography needs. 


Also a big thank you to Julie, James, and baby Jake for letting me be a part of the celebration. I hope you all loved it!


Sunday, July 24, 2016

Grande Macaron (Plus a Video)

My friends, Denver and Meng Meng, started a media company called Enjoy. Denver is very active in the film world, and has worked with the production of major shows, like MasterChef Junior, as well as filming music videos! The husband and wife duo branched out to grow their personal brand, while doing what they love! 


When Denver approached me about doing this video, I was nervous to say the least... He and Meng Meng were so friendly and supportive when sharing their vision and directing me through it. Nonetheless, there's a reason I stick to blogging. You can take a peek at the 30-second promo here:


For this video, I wanted to make something that is elegant and makes a statement. The grande macaron was a great way to do that! It's basically a giant macaron filled with mousse and garnished with raspberries.

Grande Macaron (makes about 3-5 macarons)
Shells
100g Almond Flour
110 g Confectioner's Sugar
15 g Cocoa Powder
50 g Granulated Sugar
70 g Egg Whites (2 large whites)
 
1. Pulse almond flour, cocoa powder, and powdered sugar in a food processor until very finely ground. Be careful not to grind too long, because it will release all of the oils, ruining your final product.
2. Sift the powder with a medium-mesh sieve.
3. Place the particles that are too large to fit through the sieve back into the food processor, pulse, and sift again. Throw out the excess pieces.
4. In a grease-free bowl, place your egg whites and sugar. Allow to sit for a few minutes to begin to dissolve.
5. Use grease-free beaters on high speed to whip the egg whites to stiff peaks.
6. Use a rubber spatula to fold the dry ingredients into the meringue until the batter moves slowly, like lava. If you run your spatula through it, it should fall together after 5-7 seconds.
7. Put the mixture into a piping bag fitted with a large round tip (3/8 inch). 
8. Pipe rounds that are about an inch apart onto a nonstick baking mat (silpat) that is placed onto a cookie sheet. 
9. Do this by holding the bag straight up about half an inch above the silpat, applying pressure to the bag until about 2-2.5 inches in diameter, stopping pressure, and then removing by moving hand in a very small circular motion to release the tip from the macaron shell. Make sure there is enough space to spread.
10. Rap your cookie sheet/sheet pan on the table a few times to make sure there are no bumps on the macaron shells.
11. Let rest until dry to the touch (about 30-45 minutes, longer on rainy days).
12. Preheat oven to 300 degrees F. If you have a convection oven, use convection.
13. Bake macaron shells on the second shelf of the oven for 20-25 minutes, until they do not wiggle when nudged.
14. Remove from oven and allow shells to cool completely before removing from the silpat.


Chocolate Mousse
3.75 oz Dark/Semi-Sweet Chocolate
4 oz Heavy Cream
.5 packet (.13 oz) Gelatin
.75 oz Water, to Bloom Gelatin
1.75 oz Sugar
.5 oz Water, to Melt Sugar
1.25 oz Egg Yolks
1 box Raspberries

1. Melt the chocolate in a heat proof bowl placed on top of a pot of boiling water (double boiler).
2.  Whip the heavy cream to soft peaks and set aside.
3. In a small container, mix gelatin and water and allow to bloom.
4. Begin whipping the yolks. You are looking to aerate them to a pale yellow.
5. As the yolks begin whipping, heat the sugar and water in a pan. Allow to boil and become slightly syrupy. The bubbles will start to linger slightly, but the sugar syrup will not become very thick or change color. You will probably cook the sugar for about 1 minute to get to this point.
6. Pour the sugar syrup very slowly into the yolks as you whip them. Be careful as it is extremely hot. This is best done in a standing mixer.
7. Once the sugar is poured in, melt the gelatin mixture. Pour the melted gelatin into the yolks. Keep the yolks whipping until completely cool.
8. Once cooled, fold the yolks into the chocolate.
9. Once combined, add the cream and mix until smooth. Allow to set in the fridge until it is no longer soft, and is completely set. This could be a few hours or overnight.

Assembly
1. Pair the shells by size.
3. Put the mousse into a piping bag with the same tip that you used to pipe the macarons.
4. Pipe the mousse into the center of the macaron. You want to hold the bag about 3/4 inch to one inch above the surface. Pipe leaving plenty of room for raspberries to go around.
5. Place fresh raspberries around the mousse, allowing it to hold them in place.
6. Put the other shell onto the top to create a "sandwich". 
7. Place in the fridge a few hours before to allow the flavors to develop.

The macaron definitely packs a wow factor, with great flavor. Chocolate and raspberry are the perfect pair, so I was definitely excited to try it!

If you ever have any film or photography needs, you definitely should consider Enjoy. They do corporate videos, events, weddings, and music videos. Enjoy also does social media management. I can attest to the difficulty of trying to manage social media while working full time. It's a great way to grow your audience, and can definitely benefit your site.

Be sure to check them out for all of your media needs!

Facebook: /enjoynewmedia
Instagram: @enjoynewmedia
Website: http://www.weareenjoy.com/