Showing posts with label local. Show all posts
Sunday, September 25, 2016
Apple Picking and Puff Pastry
Fall is officially upon us, although this week was still brutally hot in Georgia. Despite the hot weather, some friends and I went to a local orchard to go apple picking! We went to an orchard that had a lot of different apples to choose from and pick. The orchard we went to also had cow milking and pig racing! Both of them were pretty anticlimactic... Nonetheless we had a great time!
My favorite part of the day was a little stop we made on the way back. On the way to the orchard, we saw a huge field of sunflowers from the road. We decided to take a quick adventure on the way back to Atlanta. The field had over 90,000 sunflowers, and lots of bees and butterflies to support! I'd say the only negative was when I stepped in an ant pile (ouch!). The orchard was about an hour and a half from the city, so we definitely made the most of the trip there!
We picked a total of 62 apples, and split it up between 8 of us. I don't usually eat apples, but the season calls for lots of apple desserts. I put together a quick cobbler and a pie, but I really wanted to make a flaky pastry with some of my apples.
I haven't made puff pastry since culinary school. It was only once before, and I understand why I haven't tried to make it again. It's a time consuming dough, but the finished product is well worth it! Laminated dough is something really special- every layer you make ends up in the finished product, creating the most wonderful texture. On top of that, the dough itself is not sweet.
Apple Puff Pastry (makes 12)
Dough
8 oz Flour
2.7 oz Water
2 oz Butter, Softened
Pinch Salt
1/3 of an Egg (mix it, then add only a third)
1 oz White Wine
8 oz Plugra Butter, for Butter Block
1. Place the water, egg, wine, butter into a mixing bowl for a standing mixer. Then add the dry ingredients into the bowl. Use a dough hook attachment to mix the dough well.
2. Once the dough has started to gather and pulls away from the sides, turn on a timer and continue to mix on low speed for 6 minutes.
3. After 6 minutes, shape the dough into a square shape, wrap the dough, and put it into the fridge to rest.
4. Make a butter envelope by folding a piece of parchment paper to 7 inches x7 inches. You should be able to make an envelope shape. This is done by folding the parchment in half, short end to short end. Then, fold the sides in toward the center, so that the area inside of the fold is 7 inches. Then, fold the top portion of the parchment down, so that the square is complete.
5. Place the plugra butter block into the envelope. Use your rolling pin to roll the butter into the shape of the square. Make sure it's evenly rolled out. Place in the fridge to harden.
6. Once the dough and butter are at a similar consistency, pull them both out. They should both be firm but not hard.
7. On a floured surface, roll out the dough to a 10 inch x 10 inch square. Place the butter block on the dough, so that it sits as a diamond within the square. Bring the corners of the dough together to cover the butter. Do not overlap the dough corners.
8. Roll out the dough to a long rectangle. This is the portion of the dough where you make multiple folds to create layers of butter and dough. The first fold should be a 3-fold. Fold one side in, and the other side over, so that it is like a letter. Wrap and rest in the fridge for 15 minutes.
9. Roll out the dough in the opposite direction of the last fold. If the fold finished on the side, you should rotate the dough 90 degrees, so that the fold would finish on top or bottom. Roll out the dough to a long rectangle again. Fold the right side about 1/4 of the way inward. Then, fold the other side to meet the first flap. Then, fold the dough in half. Wrap the dough and rest in the fridge for 15 minutes.
10. Remove the dough from the fridge and repeat steps 8 and 9, so that you have performed a 3 fold, a 4 fold, a 3 fold, and another 4 fold.
11. Place the dough back into the fridge to rest until you are ready to assemble.
Frangipane (Almond Cream)
.5 stick Butter
2 oz Sugar
1.5 oz Almond Flour
1 egg
.5 oz Flour
.5 tsp Vanilla
1. Cream butter, sugar, and almond flour together in a bowl.
2. Add egg and vanilla.
3. Scrape the bowl to make sure that the ingredients are well incorporated.
4. Add flour and mix until incorporated.
Assembly
Final puff pastry dough
Frangipane
2 Apples
2 tbsp Sugar
Pinch Clove
Pinch Cinnamon
Pinch Ground Ginger
1. Roll out the puff pastry to about 1/8 inch thick. You can leave it a tiny bit thicker, but you want it to be less than 1/4 inch.
2. Preheat oven to 400 degrees F
3. Cut the rolled dough to 3.5 x 3.5 inch squares.
4. Place squares onto a flat, parchment lined sheet pan. There should be some space in between each.
5. Pipe frangipane into the center third of the pastry. This should be a layer that is not too thin or too thick. I look for something about 1/2 an inch thick.
6. Slice your apple into 1/4ths. Then slice out the core by make a diagonal cut. Cut the apple piece in half.
7. Taking the 1/8th of the apple, lay it on its side, so that the flesh faces away from you. Use your knife to slice about 1/8 inch pieces. You can discard the end pieces.
8. Arrange the sliced apples on top of the frangipane.
8. Sprinkle a small amount of the sugar and spice mixture over the top.
9. Bake the pastry for about 20-25 minutes, until golden brown.
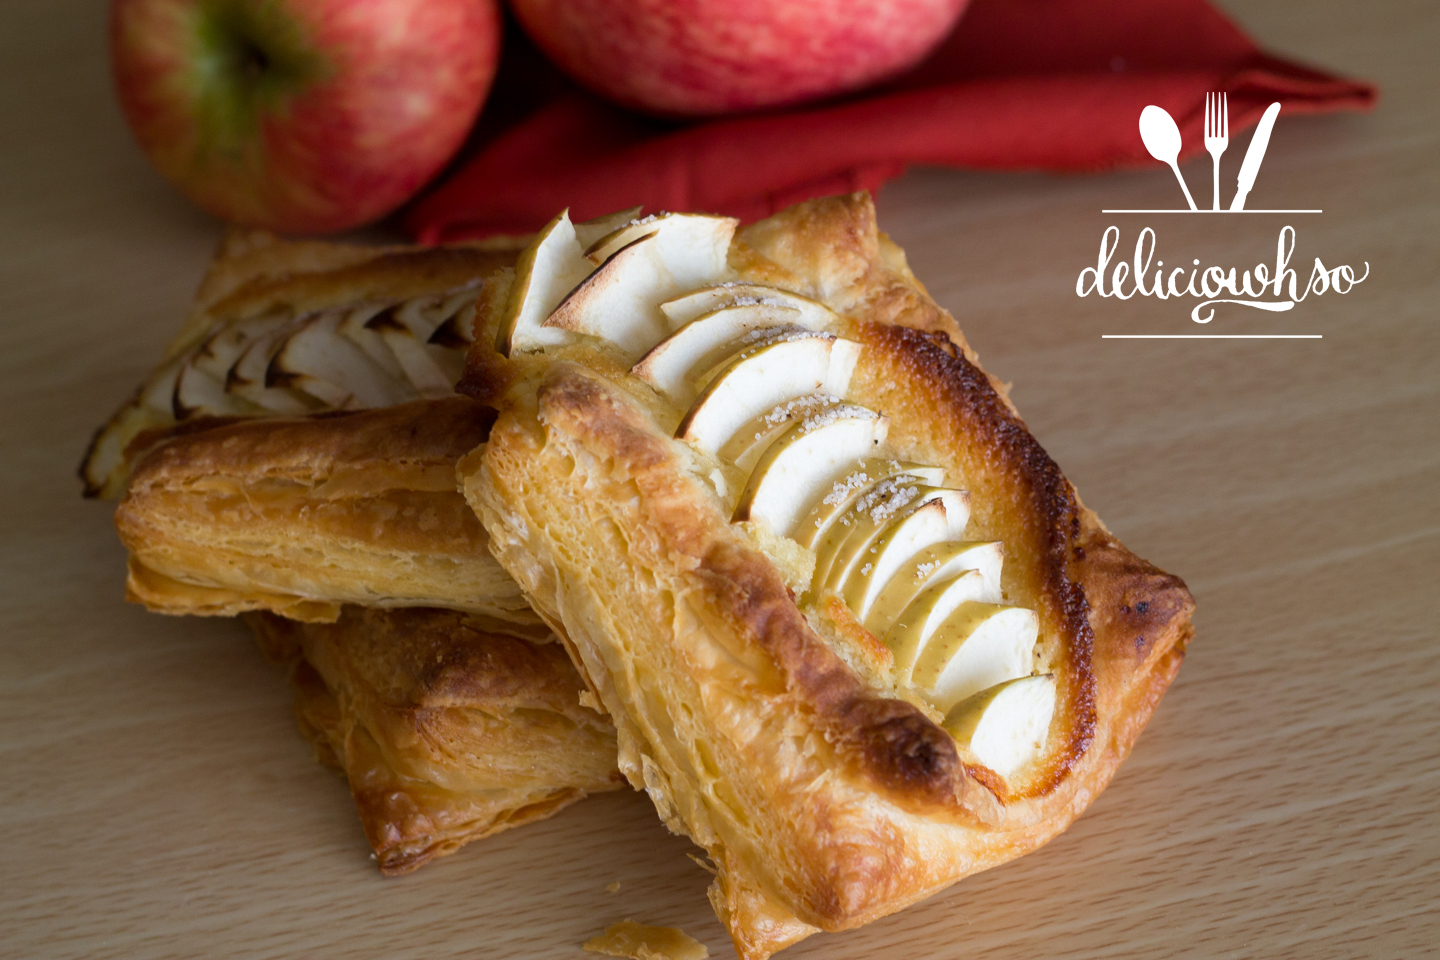
Once the apple pastries come out, they are flaky and tasty. The apples have a great natural sweetness that pairs perfectly with the almond cream and nutty pastry. If you're eating this after a day or multiple, be sure that you put it into the toaster oven for a short time. This will allow the pastry to recrisp. If you are short on time, you can also recreate this using store bought puff pastry.
I'm not the biggest dessert person, but I am a total sucker for french pastry. I love that it isn't too sweet, but still has a lot of integrity. French pastry is completely classic, elegant, beautiful, and tasty! It is a little bit time consuming, but definitely worth the effort.
Sunday, June 12, 2016
Appa's x Delici-owh-so
I'll be featuring a different dessert (maybe two) every week. They'll have delici-owh-so macarons and cream puffs, alternating. The flavors will be different every time, so you should come out and try them!
This week, I featured a green tea cream puff. They were topped with a crispy craquelin, which brought a fun texture and a sweetness that accompanies the choux pastry perfectly. They were filled with a light green tea filling that makes for a perfect ending to the sushi meal.
If you're local, this place is a MUST-TRY!!! The bowls and burritos are perfectly seasoned, and they're even better with the appa and umma sauces. Appa is spicy, and umma is sweet. It's a perfect topping for the fresh fish and crispy veggies. "Appa" is father in Korean, and "Umma" means mother. It's a cute and clever way to describe the sauces, and the flavors do not disappoint!
You can definitely tell that all of the food is made with a lot of love, effort, and passion by this one adorable family! I love that I get to take part in bringing great food to our city, and hope that everyone gets the chance to make it out! We put a lot of thought into every element of what we're sharing, and we look forward to the weeks to come! Follow @appasatl and @deliciowhso to see more updates on the featured desserts!
Sunday, May 3, 2015
Rose Jelly
I have knockout rose bushes growing right outside my house. The roses are untreated, so I thought it would be fun and innovative to use them to create something fun! The colors of the petals are a beautiful pink that translates perfectly into jelly.
The key to making rose-flavored things is using the most fragrant roses. They tend to carry the flavor better. If you don't have a strong enough flavor, you can always add rosewater for a more floral essence.
Rose Jelly (makes about 3 cups)
1 cup Water
1 cup Sugar
1.5 cup Rose Petals
1 tsp Lemon Juice
2 tbsp Pectin
2 tbsp Rose Water (optional)
1. Prepare untreated, pesticide-free rose petals by plucking them off of the buds, and then using scissors to cut off the white part where the petal was attached.That section is bitter.
2. Mix the sugar and pectin together by gently whisking. Then, bring water, sugar,and petals to a boil.
3. Let the mixture simmer for 5 minutes. The color will seep out of the rose petals, and the mixture will look dull.
4. Add the lemon juice to the mixture and stir. The color should pop once again. You would add rose water to the mixture at this point, if desired.
5. Allow the mixture to thicken slightly. The mixture will start to coagulate. You can test the consistency of the jelly by cooling a drop quickly in the freezer. If it is too loose, add more pectin. If it is too tight, add more water.
6. Pour into a sanitized, heat proof mason jar as soon as it is ready, and seal the lid immediately. It will slowly seal itself because of the heat. It's a way to quickly can the jelly
7. Allow it to cool to room temperature, and then transfer the jar into the refrigerator.
8. The jelly will last a couple of weeks after opening.
The jelly is a great balance of sweetness and acidity, with floral notes from the rose petals. The petals are a great inclusion, and make the jelly look incredibly unique in the jar. It's something that you wouldn't really find at a grocery store. It's a perfect wake-me-up with some artisan bread and butter!
The tea towel pictured is one that my friend, Esther gave me. She bought it from Crafted Westside, a small handmade goods boutique. Local Georgia artists display and sell their art there, and it's a great way to pick up a unique gift. I love this tea towel- not only is it adorable, but it also can be washed and dried with my other laundry! Plus, it photographs well :)
The key to making rose-flavored things is using the most fragrant roses. They tend to carry the flavor better. If you don't have a strong enough flavor, you can always add rosewater for a more floral essence.
Rose Jelly (makes about 3 cups)
1 cup Water
1 cup Sugar
1.5 cup Rose Petals
1 tsp Lemon Juice
2 tbsp Pectin
2 tbsp Rose Water (optional)
1. Prepare untreated, pesticide-free rose petals by plucking them off of the buds, and then using scissors to cut off the white part where the petal was attached.That section is bitter.
2. Mix the sugar and pectin together by gently whisking. Then, bring water, sugar,and petals to a boil.
3. Let the mixture simmer for 5 minutes. The color will seep out of the rose petals, and the mixture will look dull.
4. Add the lemon juice to the mixture and stir. The color should pop once again. You would add rose water to the mixture at this point, if desired.
5. Allow the mixture to thicken slightly. The mixture will start to coagulate. You can test the consistency of the jelly by cooling a drop quickly in the freezer. If it is too loose, add more pectin. If it is too tight, add more water.
6. Pour into a sanitized, heat proof mason jar as soon as it is ready, and seal the lid immediately. It will slowly seal itself because of the heat. It's a way to quickly can the jelly
7. Allow it to cool to room temperature, and then transfer the jar into the refrigerator.
8. The jelly will last a couple of weeks after opening.
The jelly is a great balance of sweetness and acidity, with floral notes from the rose petals. The petals are a great inclusion, and make the jelly look incredibly unique in the jar. It's something that you wouldn't really find at a grocery store. It's a perfect wake-me-up with some artisan bread and butter!
The tea towel pictured is one that my friend, Esther gave me. She bought it from Crafted Westside, a small handmade goods boutique. Local Georgia artists display and sell their art there, and it's a great way to pick up a unique gift. I love this tea towel- not only is it adorable, but it also can be washed and dried with my other laundry! Plus, it photographs well :)
Sunday, March 23, 2014
Cream of Asparagus Soup
Cream of Asparagus Soup (Makes 4 small servings)
1 lb Asparagus
1 tsp Salt
1/2 tsp Pepper
1/2 tsp Garlic Powder
1 tbsp Lemon Juice
2 tbsp Olive Oil
2 cups Water
4 cloves Garlic
1 cup Heavy Cream
2 tbsp Butter
1/4 cup Sour Cream
1 tsp Salt
4 tbsp Sour Cream, for garnish
4 slices Bacon, for garnish (optional)
2 tbsp Olive Oil, for garnish
1 tbsp Lemon Juice, for garnish
Baguette, for garnish
1. Preheat oven to 350 degrees F.
2. Rinse and trim the ends off of the asparagus.
3. Place onto a baking sheet and season with salt, pepper, garlic powder, lemon juice, and and olive oil.
4. Bake until tender, about 20 minutes.
5. Cut the asparagus after its cooled down into 1 inch pieces.
6. Place into a medium sized pot with 1 cup of water. With 4 roughly chopped cloves of garlic
7. Boil the asparagus for about 10 minutes, until very tender.
8. Use an immersion blender to puree the asparagus. If you don't have an immersion blender, use a regular blender.
9. Once the asparagus is smooth, add cream, butter, sour cream, and salt.
10. Mix until smooth, and thickened. It will not be completely smooth, since the asparagus fibers are not smooth. The finished soup will have a chowder or bisque consistency.
11. Slice baguette and toast in the oven.
12. Cook bacon until crispy. Cut into small pieces.
13. Pour soup into serving bowls and top with a dollop of sour cream (about a tbsp), sprinkle of bacon pieces, drizzle (1/2 tbsp) of olive oil, and a small squirt of lemon juice (1/4 tbsp). Finish with the toasted baguette slices and serve immediately.
The soup alone can look like baby food, but the garnishes add a color and texture to the soup to make it much more appetizing. You can toast the remaining baguette and serve it with the soup. It's very rich, so it's a good idea to have the extra bread to balance.
Markets like Haymarket aren't anything like the boutique farmers markets where organic farmers sell their locally grown produce for high prices. It's more like the TJ Maxx of produce, but dirtier, cheaper, and louder. The produce that the grocery stores do not accept get taken to the market to be sold for lower prices. You have to look a little harder to find quality produce, but for the bargain, the inferior quality is not something to be upset about.
Sunday, October 20, 2013
Apple Picking
This isn't your traditional bread pudding and ice cream. The bread pudding has a oatmeal gruyere topping that perfectly accompanies the sweetness of the apples. It's made with Portuguese sweet buns from a local bakery. The ice cream is a maple, bacon, and roasted apple ice cream that is a perfect balance of sweet and savory. The saltiness of the cheese and bacon balances the sweet brown sugar and maple syrup in the bread pudding and ice cream to create a delicious fall dessert.
Cinnamon Apple Bread Pudding
Stale Diced Sweet Bread (Enough to overfill a 9x13in casserole dish)
5 Medium Apples
1/4 tsp Salt
1 pinch Pepper
2 tbsp Maple Syrup
2 tbsp Butter
1/2 tsp Cinnamon
1 cup Milk
1 cup Heavy Cream
1 Vanilla Bean
1/4 cup Sugar
1/2 cup Brown Sugar
9 Eggs
1 tsp Cinnamon
1. Peel, core, and medium dice apples.
2. Heat a saute pan and add butter.
3. Once hot, add apples. Season with salt, pepper, and maple syrup.
4. Stir until apples are tender. Remove from heat.
5. In a separate pot, place split vanilla bean, milk, and heavy cream.
6. In a large bowl, mix sugar, brown sugar, eggs, and cinnamon.
7. When the milk boils, pour slowly into the eggs. Whisk constantly.
8. Place apples and bread into the mixture, allow to soak.
9. Place into the greased 9x13in casserole dish.
Oatmeal Gruyere Topping
1/4 cup Oats
1/8 cup Brown Sugar
1 tbsp Butter
3 oz Gruyere Cheese
1. Melt butter.
2. Shred Gruyere. Mix into the oats and sugar.
3. Add butter and mix until incorporated.
4. Generously top the bread pudding.
5. Bake at 350F until set. The bread pudding will souffle (expand slightly), and the topping will be golden.
Maple, Bacon, and Roasted Apple Ice Cream
10 oz Heavy Cream
6 oz Milk
2 oz Sugar
2 oz Maple
4 Yolks
1 Egg
1 Apple
2 slices Bacon
1 tbsp Brown Sugar
1 pinch Salt
1 tsp Maple
1 tbsp Butter
1 pinch Cinnamon
1. Place the ice cream maker bowl into the freezer. Many ice cream makers have a bowl that needs to be in the freezer overnight to ensure proper freezing. Follow the manufacturer's directions for this step.
2. In a pot, heat milk, cream, and sugar.
3. In a bowl, mix maple, egg, and yolk.
4. Once milk mixture boils, pour slowly into egg mixture while mixing constantly.
5. Pour the mixture back into the pot. Turn the heat to low.
6. Mix constantly while touching the bottom of the pot with a wooden spoon.
7. When the mixture thickens slightly, pour through a fine sieve into a bowl. This will remove any curdled egg pieces.
8. Cut bacon into small pieces.
9. Peel, core and small dice apple.
10. In a saute pan, cook bacon.
11. Once cooked, add apple. Then add sugar, salt, maple, butter, and cinnamon.
12. Cook until apples are tender.
13. Pour apple and bacon into the ice cream base. Cover with plastic wrap covering the surface.
14. Place into the fridge overnight to allow the flavors develop.
15. Pour the ice cream base through a sieve to keep the bacon and apple out of the ice cream base. This will keep the apple and bacon intact while the ice cream begins to spin.
16. Spin the ice cream according to the manufacturer's directions. When halfway frozen, add the bacon and apples.
17. Remove the ice cream and into an airtight container. The texture will be similar to soft serve. Allow to harden in the freezer before eating.
When serving this dessert, warm the bread pudding in the oven slightly. Serve with cold ice cream on a brisk fall day! Don't forget to share with your friends!
Go out and support your local growers by going apple picking!!! Not only is the produce delicious, but it's organic, tasty, and inexpensive! Take those apples and make something yummy to share.
Sunday, September 1, 2013
Shrimp Shiitake Noodle Soup
One of the sous chefs at work always used to tell me "stick to your roots". Although this can apply to my mentality and my work ethic, it can also apply to the type of food I make! Recently I went to a farmers market when I visited some friends in Athens, Georgia. I got some locally grown shiitake mushrooms and had to use them on the blog :)
I thought about sticking to my roots... and came up with an Asian soup using a local, Georgia-grown product. This soup is a simple dish with a very light, refreshing, clean flavor. It is not a oily or heavy soup that will leave you wishing you didn't finish that last bite. Instead, it will leave you wanting another bowl.
Shrimp Shiitake Noodle Soup (Serves 8)
1 tsp Sesame Oil
Shrimp Shiitake Noodle Soup (Serves 8)
1 tsp Sesame Oil
1/2 lb Medium Sized Shrimp
1 Onion
1 pack Enoki Mushroom
3 oz Shiitake Mushroom
2 tbsp Salt
2 tsp Pepper
2 tbsp Garlic Powder
1 tsp Sesame Seeds
10 cups Water
2 tbsp Soy Sauce
1 lb Somen Noodles
2 Eggs
3 oz Spinach
1. Peel and devein shrimp. Remove the shell that is on the tails as well. Rinse the shrimp thoroughly.
2. Slice onions to about 1/4 in slices. Slice off the end of the enoki mushrooms. If needed, cut the shiitake mushrooms into smaller pieces, about the size of a nickel.
3. Put a large pot over high heat.
4. Pour sesame oil and allow to heat up.
5. Once hot, put shrimp at once into the pot. Toss a couple times.
6. Add onions and mushrooms. Sprinkle the seasoning over the ingredients in the pot and stir to incorporate.
7. Add water when everything is about halfway cooked. Par-cooking the food allows it to develop some flavor, and speeds the cooking process.
8. Add soy sauce to season soup. Allow the soup to come to a boil. Then turn the heat to medium and allow it to simmer for 15-20 minutes.
9. In the meantime, boil water in a separate saucepan to cook the noodles.
10. Once boiling, add the noodles and cook for about 2 minutes.
11. Pour out the noodles into a strainer and rinse with cold water.
12. Mix eggs together in a bowl until the yolks and whites are not separated. After the soup has been simmering for 15-20 minutes, pour eggs slowly into the pot and mix as you pour.
13. Add spinach and mix until the leaves wilt slightly.Then, turn off the heat.
14. Place noodles into a soup bowl and pour the hot soup over the noodles. The soup is ready to serve!
My baby brother, Seth, tested this soup and he loves it! Try this simple recipe at home and feed it to your family!
7. Add water when everything is about halfway cooked. Par-cooking the food allows it to develop some flavor, and speeds the cooking process.
8. Add soy sauce to season soup. Allow the soup to come to a boil. Then turn the heat to medium and allow it to simmer for 15-20 minutes.
9. In the meantime, boil water in a separate saucepan to cook the noodles.
10. Once boiling, add the noodles and cook for about 2 minutes.
11. Pour out the noodles into a strainer and rinse with cold water.
12. Mix eggs together in a bowl until the yolks and whites are not separated. After the soup has been simmering for 15-20 minutes, pour eggs slowly into the pot and mix as you pour.
13. Add spinach and mix until the leaves wilt slightly.Then, turn off the heat.
14. Place noodles into a soup bowl and pour the hot soup over the noodles. The soup is ready to serve!
My baby brother, Seth, tested this soup and he loves it! Try this simple recipe at home and feed it to your family!
Sunday, August 11, 2013
Fried Green Tomato Salad
Fried green tomatoes are a southern staple. Green tomatoes are under-ripe tomatoes. They are more tart, and their texture is firmer. Because of this characteristic, they are a good product to fry. They don't fall apart in the high heat and the bubbly oil. They also do not have large amounts of moisture that will cause the oil to pop/explode. Instead the texture softens slightly and the tomato holds together well. The final product can be used to put into burgers, dipped in pimento cheese, or placed on top of a fresh salad. I used fresh spinach, dried cranberries, chopped pecans, and goat cheese to create a salad that lightens the southern soul food classic. Fried green tomatoes can often be very heavy since they are fried, but it pairs nicely with the components of the salad. Finished with an apple cider and honey vinaigrette, this salad is a healthy and light alternative to heavy and greasy southern soul food.
Fried Green Tomato Salad (Serves 4)
Fried Green Tomatoes
1 Green Tomato
1/2 cup All Purpose Flour
1 Egg, Beaten
1/2 cup Breadcrumb
Vegetable or Canola Oil (For Frying)
1. Use a sharp knife to cut the tomato into 1/4 in thick rounds.
2. Put flour, egg, and breadcrumb each into separate wide bowls.
3. Dip each tomato slice into flour, then into the egg, and then into the breadcrumb. Coat on both sides.
4. Heat the oil to about 375 degrees F. You can test it by dropping a tomato into the oil. it should immediately float and begin to cook.
5. Remove tomato after the color is golden, about 3-5 minutes. If the color is changing too quickly, the oil is too hot and you should lower your heat.
6. Place finished tomato onto a plate with a couple layers of paper towels to soak up excess oil.
Apple Cider and Honey Vinaigrette
1/4 cup Apple Cider Vinegar
1/4 cup Honey
2 tbsp Brown Sugar
1/4 cup Olive Oil
1. Place all ingredients into a bowl.
2. Whisk quickly to combine and emulsify the mixture.
Salad Assembly
9oz bag Spinach
4 oz Goat Cheese
1/4 cup Dried Cranberries
1/4 cup Chopped Toasted Pecans
Fried Green Tomatoes
Apple Cider and Honey Vinaigrette
1. Thinly chop red onion.
2. Place spinach into a salad bowl.
3. Crumble goat cheese into the spinach.
4. Sprinkle cranberries and pecans on top of the salad.
5. Pour dressing onto the salad.
6. Mix well and serve.
Fried Green Tomato Salad (Serves 4)
Fried Green Tomatoes
1 Green Tomato
1/2 cup All Purpose Flour
1 Egg, Beaten
1/2 cup Breadcrumb
Vegetable or Canola Oil (For Frying)
1. Use a sharp knife to cut the tomato into 1/4 in thick rounds.
2. Put flour, egg, and breadcrumb each into separate wide bowls.
3. Dip each tomato slice into flour, then into the egg, and then into the breadcrumb. Coat on both sides.
4. Heat the oil to about 375 degrees F. You can test it by dropping a tomato into the oil. it should immediately float and begin to cook.
5. Remove tomato after the color is golden, about 3-5 minutes. If the color is changing too quickly, the oil is too hot and you should lower your heat.
6. Place finished tomato onto a plate with a couple layers of paper towels to soak up excess oil.
Apple Cider and Honey Vinaigrette
1/4 cup Apple Cider Vinegar
1/4 cup Honey
2 tbsp Brown Sugar
1/4 cup Olive Oil
1. Place all ingredients into a bowl.
2. Whisk quickly to combine and emulsify the mixture.
Salad Assembly
9oz bag Spinach
4 oz Goat Cheese
1/4 cup Dried Cranberries
1/4 cup Chopped Toasted Pecans
Fried Green Tomatoes
Apple Cider and Honey Vinaigrette
1. Thinly chop red onion.
2. Place spinach into a salad bowl.
3. Crumble goat cheese into the spinach.
4. Sprinkle cranberries and pecans on top of the salad.
5. Pour dressing onto the salad.
6. Mix well and serve.
Sunday, August 4, 2013
Blueberry Picking
It's blueberry season! There are several farms in Georgia that allow you to go to the fields and pick your own blueberries! Although it takes some work to find the freshest, plumpest blueberries, the hard work yields amazing results. Not only are the blueberries cheap ($1.99/lb), but you can sample along the way! It's a great experience and tons of fun. They are cheap, delicious, and they are organically grown!

There are tons of things you can do with blueberries! Eat them fresh, use them in a smoothie, decorate cakes/tarts, make blueberry muffins, make some pancakes... There are so many options! I used the blueberries to make blueberry muffins. Use this recipe to make brunch for the family or have a breakfast on the go. It's easy, quick, and you don't need a mixer!
Blueberry Muffins (makes 18 muffins)
1 Stick Softened Butter
1.5 cups Flour
1 cup Sugar
1 tsp Salt
1.5 tsp Baking Powder
3 Eggs
1/2 cup Milk
1.5 cups Blueberries
1. Preheat oven to 350 degrees F.
2. Use your hand to mix butter, flour, sugar, salt, and baking powder together. Do this by squeezing/rubbing the mixture between your fingers repeatedly.
3. Stop mixing just before it becomes a dough. It will have a crumbly texture.
4. Whisk together milk and eggs.
5. Add liquid slowly to the dry as you mix with your hand to incorporate.
6. Fold in about 1 cup of blueberries.
7. Scoop about 3/4 of the way up in muffin tins lined with paper muffin cups.
8. Put a small handful of blueberries on top of each muffin.
Oat Topping
1 cups Oats
1/4 cup Brown Sugar
1 tbsp Butter
1. Melt butter.
2. Use your hands to mix brown sugar and oats with the melted butter until completely incorporated.
3. Top each muffin with a small handful of topping.
4. Bake for 25 minutes, until the center springs back when pressed and the color is golden.
Unfortunately, blueberry season's almost over. So make your way to a local blueberry patch and get them before they're gone!
1.5 tsp Baking Powder
3 Eggs
1/2 cup Milk
1.5 cups Blueberries
1. Preheat oven to 350 degrees F.
2. Use your hand to mix butter, flour, sugar, salt, and baking powder together. Do this by squeezing/rubbing the mixture between your fingers repeatedly.
3. Stop mixing just before it becomes a dough. It will have a crumbly texture.
4. Whisk together milk and eggs.
5. Add liquid slowly to the dry as you mix with your hand to incorporate.
6. Fold in about 1 cup of blueberries.
7. Scoop about 3/4 of the way up in muffin tins lined with paper muffin cups.
8. Put a small handful of blueberries on top of each muffin.
Oat Topping
1 cups Oats
1/4 cup Brown Sugar
1 tbsp Butter
1. Melt butter.
2. Use your hands to mix brown sugar and oats with the melted butter until completely incorporated.
3. Top each muffin with a small handful of topping.
4. Bake for 25 minutes, until the center springs back when pressed and the color is golden.
Unfortunately, blueberry season's almost over. So make your way to a local blueberry patch and get them before they're gone!
Subscribe to:
Posts (Atom)


